Sky image
Introduction and Concept
The SkyImage class represents the main data container class for
image-based gamma-ray data. It combines the raw 2D data arrays with sky coordinates
represented by WCS objects and Fits I/O functionality. Additionally it provides
convenience functions for and creating, exploring and accessing the data.
Data processing methods (except for very basic ones) are not coupled to this class.
Getting started
Most easily a SkyImage can be created from a fits file:
from gammapy.image import SkyImage

filename = '$GAMMAPY_EXTRA/datasets/fermi_2fhl/fermi_2fhl_gc.fits.gz'
image = SkyImage.read(filename, hdu=2)
Alternatively an empty image can be created from the scratch, by specifying the
WCS information (see empty for a detailed description of
the parameters):
image_empty = SkyImage.empty('empty')
Where the optional string 'empty' specifies the name of the image.
Some basic info on the image is shown when calling:
image.info()
To lookup the value of the data at a certain sky position one can do:
from astropy.coordinates import SkyCoord
position = SkyCoord(0, 0, frame='galactic', unit='deg')
image.lookup(position)
Or directly pass a tuple of (ra, dec) or (lon, lat), depending on the
type of WCS transformation, that is set.
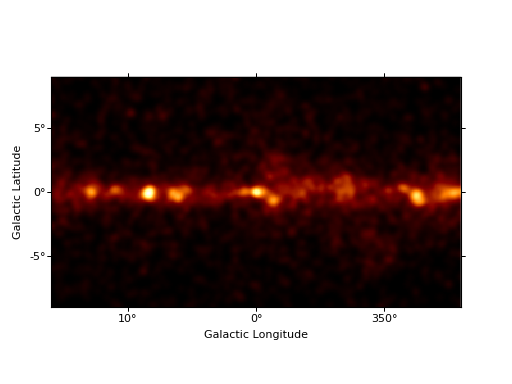
The image can be easily displayed with an image viewer, by calling image.show():
from gammapy.image import SkyImage

filename = '$GAMMAPY_EXTRA/datasets/fermi_2fhl/fermi_2fhl_gc.fits.gz'
counts = SkyImage.read(filename, hdu=2)
counts.name = 'Counts Smoothed'
counts.show()

Cutout and paste
The SkyImage class offers paste() and
cutout()
methods, that can be used to cut out smaller parts of a image.
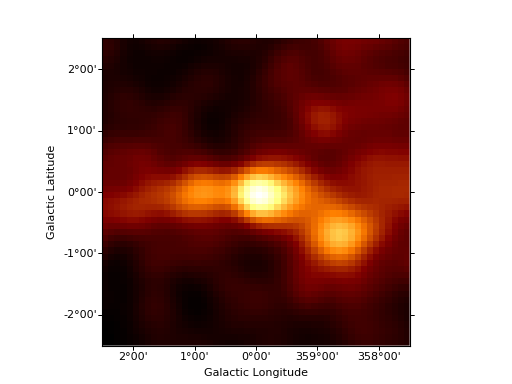
Here we cut out a 5 deg x 5 deg patch out of an example image:
from astropy.units import Quantity
from astropy.coordinates import SkyCoord
from gammapy.image import SkyImage

filename = '$GAMMAPY_EXTRA/datasets/fermi_2fhl/fermi_2fhl_gc.fits.gz'
counts = SkyImage.read(filename, hdu=2)
position = SkyCoord(0, 0, frame='galactic', unit='deg')
size = Quantity([5, 5], 'deg')
cutout = counts.cutout(position, size)
cutout.show()

cutout is again a SkyImage object.
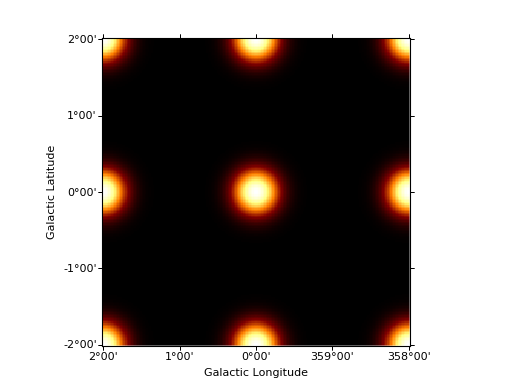
Here’s a more complicated example, that uses paste() and cutout()
to evaluate Gaussian model images on small cut out patches and paste
them again into a larger image. This offer a very efficient way
of computing large model sky images:
import numpy as np
from gammapy.image import SkyImage
from astropy.coordinates import SkyCoord
from astropy.modeling.models import Gaussian2D
from astropy import units as u

BINSZ = 0.02
sigma = 0.2
ampl = 1. / (2 * np.pi * (sigma / BINSZ) ** 2)
sources = [Gaussian2D(ampl, 0, 0, sigma, sigma),
           Gaussian2D(ampl, 2, 0, sigma, sigma),
           Gaussian2D(ampl, 0, 2, sigma, sigma),
           Gaussian2D(ampl, 0, -2, sigma, sigma),
           Gaussian2D(ampl, -2, 0, sigma, sigma),
           Gaussian2D(ampl, 2, -2, sigma, sigma),
           Gaussian2D(ampl, -2, 2, sigma, sigma),
           Gaussian2D(ampl, -2, -2, sigma, sigma),
           Gaussian2D(ampl, 2, 2, sigma, sigma),]


image = SkyImage.empty(nxpix=201, nypix=201, binsz=BINSZ)
image.name = 'Flux'

for source in sources:
    # Evaluate on cut out
    pos = SkyCoord(source.x_mean, source.y_mean,
                   unit='deg', frame='galactic')
    cutout = image.cutout(pos, size=(3.2 * u.deg, 3.2 * u.deg))
    c = cutout.coordinates()
    l, b = c.galactic.l.wrap_at('180d'), c.galactic.b
    cutout.data = source(l.deg, b.deg)
    image.paste(cutout)

image.show()
